


Make a perfect cheer bow every time. This Cheer Bow Template shows where to fold and where to place graphics. https://cheerbowsupply.com/collections/template-mats
Supplies Needed:
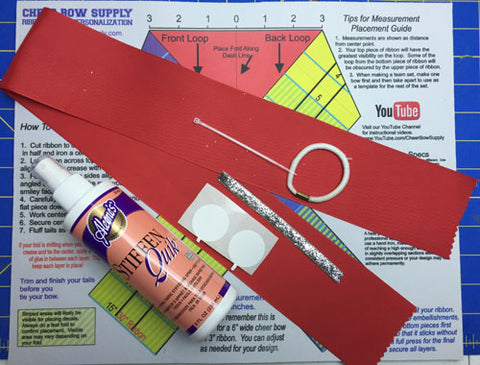
30 inches of 3 inch grosgrain ribbon
4 inches of Rhinestone Bow Center Strip
Elastic Pony Tail Holders
Hot Glue Gun
Scissors
Wood Burner
Cheer Bow Template Mat
Double Sided Disks
Zip Tie
Stiffening Spray
Iron

Step 1:
Cut your ribbon to 30 inches long. You can adjust this length to add longer tails or bigger loops. Usually, you will not need more than 32 inches of ribbon. Fold your ribbon in half to leave a visible crease as the center or make a small mark.

Step 2:
I'm using a template mat from Cheer Bow Supply to keep measurements and angles perfect. Lay your ribbon on the template mat with the crease at the center point. If using a ruler, make sure it is at least 6 inches long. Put the crease at the 3 inch mark.

Step 3:
Fold both tails of the cheer bow ribbon down following the outline on the mat. If using a ruler, fold down crossing in the center starting at 3 inches from the end middle point. Cross the ribbon in the middle making the top of the cross just under the back piece of ribbon.


Step 4:
I like to place an adhesive disk at the center point and between the crossed ribbon. This helps hold the shape. If you're not using it, just hold the ribbon firmly in the center and slide the back ribbon down on the crossed ribbon. Line up the top of the crossed ribbon with the top of the back ribbon.

Step 5:
Keeping a firm grasp on the center, work the middle back and forth a few times to create mountains and valleys in the ribbon.

Step 6:
While holding the center crease, place the plastic zip tie around the center and close it half way. Make sure you close it far enough to hold the crease you just created, but not so much that you can't make adjustments. Check your loops and tails and make sure it all looks even. You can still make minor adjustments. If you mess up, clip the zip tie and start over at step 2.

Step 7:
Align the closure at the back of the cheer bow. Pull the zip tie closed as tight as you can. Trim the extra length of zip tie.

Step 8:
Hot glue the elastic pony tail holder to the back of the cheer bow.


Step 9:
Glue the 4 inch long piece of 3/8 inch glitter velvet ribbon to the center of the bow. Wrap the side pieces of the center ribbon to the back and trim any extra. Leave enough to wrap around and glue around the pony tail holder.


Step 10:
Trim your tails by folding the ribbon end in half and cut on an angle. Lightly run a wood burner on the cut ends to prevent them from fraying.

Want to add some extras? See our YouTube Channel